Thursday, December 12, 2013

Glaze Test Firing

So I ran the kiln once already to season the new shelves I purchased. This is recommended when buying new shelves. I'm ready to do a test glaze fire.

Now, to explain my situation a little. Kiln temperatures are measured in cones. 010 being low and cone 10 being high. I have about 100lbs of cone 10 clay (high temp fire). I mixed this stoneware claybody at ECU when I graduated. I have decided to fire to cone 6 (med temp fire).
There could be all kinds of problems when doing this.
- The clay body will be less vitrified or the clay not fire completely.
   Vitrified definition: to convert into glass or a glassy substance by heat and fusion.
-The glaze may not fit. 
-There may be crawling or cracks in the glaze.

So I was hesitant and ready to see if I could get these Amaco cone 6 glazes to fit my homemade cone 10 claybody. 
Here  are the three colors I started with: white, frosted turquoise, frosted melon


Loading the kiln. The object on the left is a cone pack with pyrometric cones. These are little triangle things that measure temperatures. I have cone 5, 6, and 7 in this cone pack. I am setting the kiln to 2200 degrees. This is right between cone 6 and 7. I did this in hopes of definitely hitting cone 6.


It's working! Temp: 1847.


And the firing is complete! My three test objects stayed intact, no glazes ran or moved and they seem to fit. The kiln only went to cone 5 but it still seemed it work. 


I have a long way to go but this test firing was a success!!! I cannot wait to keep firing. 

The new/used kiln!!

I found an add on Craigslist for a used kiln. It happened it be half way between my mom and I and the right type and price. We met, picked up the kiln, had lunch and went home!
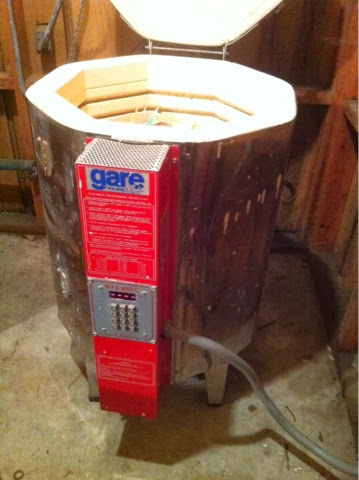
It's an Evenheat 1822 manufactured for Gare Kilns. It was the first model with the digital control panel introduced. I am still figuring that part out but it fires!


I ordered a furniture kit for my old 18" kiln and I happened to need the same size for the new kiln. Here I am unpacking the stilts for the shelves that sit inside the kiln. 


It's plugged in and ready to go!


Brought in a handy shelf to store all my firing supplies. 


We still have plans to update the wall behind and around the kiln with plywood and sheet metal for fire safety. That'll be sometime soon. But for now, this is a huge hurtle that I've cleared. On to firing now!!

Tuesday, December 3, 2013

Ready to Work!!

Me and the dogs are ready to hang out in the studio! Not all the walls are complete but I have plenty of work space. Also space for a few dog beds.


I put a shelf on the left for in progress and complete works. Painted plywood walls behind and around the work bench. 


A space heater is needed but I am definitely okay with that. 


Wheel space!!


Wall of inspiration. 


Now I'm headed out to get some pottery made. Thanks for following and please check back soon!

Meanwhile

Meanwhile, I have been searching for a new kiln. I've decided to purchase a new-used kiln to replace my ancient one. I will convert my current kiln for a different firing technique.

I connected with an old friend who has opened her own gallery in Kinston, NC. The Overland Gallery has a great mix of local North Carolina artists. They have wood, glass, weaving, paintings, pottery and more displayed in the gallery. The owner is allowing me to fire in her studio until I am up and running!! I am so appreciative and currently have a bisque firing happening now.


You can check out the Overland Gallery here: https://www.facebook.com/OverlandGallery

I have also been selling pottery at the New Bern Farmer's Market on Saturdays. We've had a pretty good turn out even though it has been cold and rainy. 
I made a pennant banner for "White Dog Wares" and hung it in our four post tent. Luckily, we have side walls to keep out the cold! 


Amanda making a dog collar, sitting next to the 'window!'


Please come check us out if you're in the area! We'll only be in New Bern one more week, December 7th. 

Construction Progress

Sorry for the delayed posting! We've been busy working on the studio and getting ready for the holidays.

Jake and I decided to do a layer of plastic against the framing of the walls. This is to keep out any moisture. Then we did a layer of foam insulation. After the insulation, we're using a hardwood plywood. We noticed the 'hardwood plywood' was not as sturdy as needed so we switched to regular plywood.


Lots of bug spray needed....


Many trips to Lowe's taken. 


Progress!!

Monday, November 11, 2013

Kiln Issues

Today I had a great friend, Lauren Rogers, over to the house. She has worked on kilns in the past and I figured I could use her expert advice to see if I could fire my kiln. I already knew the Low and Medium levels were not working but figured we could do some maintenance and see where it got us. When looking in the panel, we found a mess.


Turns out, I may need to re-wire the entire switch box. This is a pretty big setback. I am going to spend the next day or two pricing parts and equipment and deciding if it is worth fixing the older kiln or looking for a newer used kiln. 

This weekend I traveled to New Bern, NC and paid for a year's membership at the Farmer's Market. My sister Amanda and I will be selling our goods in the coming weeks. She makes handmade dog collars out of paracord. Check out a few she's made below.


In the mean times, I'll continue throwing new pots! I've got some pretty good orders for Christmas I'm working on. 


Come check us out November 23rd and 30th at the New Bern Farmer's Market!!

Tuesday, November 5, 2013

Picture this.

Here are a few images so you get the picture.


Where the magic happens, told you it was a wonderland!


The studio at the beginning.


Jake about to tear down a wall to make the display room larger.


Bowls looking out my side door.


Throwing.


Getting ready for construction.


The before look, getting ready for construction.